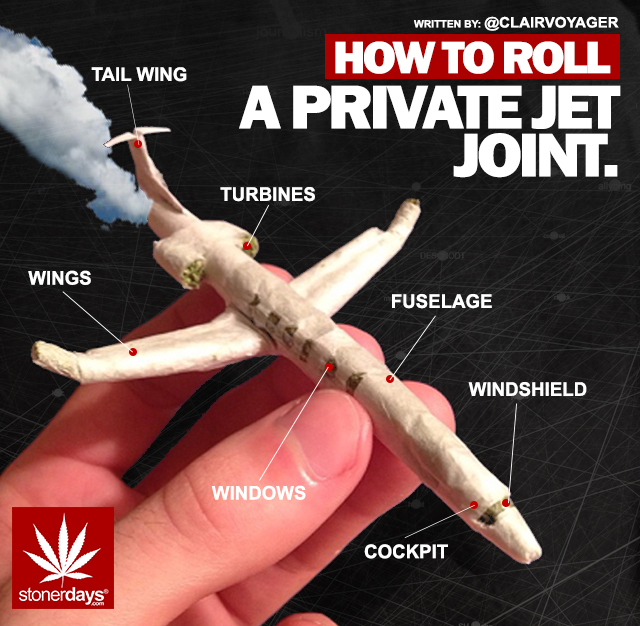
Private Jet Joint; Stoner Guide
To roll a Private Jet Joint, you’ll need the following supplies:
- Transparent papers
- regular rice papers
- scissors
- ravor
- and of course herb
![]() The first step of construction is to assemble the fuselage or the main part of the plane. This is to be rolled with the transparent papers. A skilled roller can roll it but I recommend molding the see-through papers around a pen that has the same shape as a plane fuselage. Transparent papers will slide right off the pen if they are fully dry.
The first step of construction is to assemble the fuselage or the main part of the plane. This is to be rolled with the transparent papers. A skilled roller can roll it but I recommend molding the see-through papers around a pen that has the same shape as a plane fuselage. Transparent papers will slide right off the pen if they are fully dry.
![]() Set the fuselage to the side for now, as the wings are next. You’ll need to roll two thin joints of equal length for the wings.
Set the fuselage to the side for now, as the wings are next. You’ll need to roll two thin joints of equal length for the wings.
![]() Stuff your mold with grinded herb and then put a filter/crutch into an end to keep the bud in place. The plane will be smoked from this filter once completed.
Stuff your mold with grinded herb and then put a filter/crutch into an end to keep the bud in place. The plane will be smoked from this filter once completed.
![]() If the joint paper is made slightly moist you should be able to bend the joints slowly til they fit this shape.
If the joint paper is made slightly moist you should be able to bend the joints slowly til they fit this shape.
![]() Attach a layer of paper between the joints on one side. Then flip it over and fill the middle cavity with more herb.
Attach a layer of paper between the joints on one side. Then flip it over and fill the middle cavity with more herb.
![]() Seal the cavity shut with another layer of paper and then make a slit in the middle where the wing will be attached to the fuselage.
Seal the cavity shut with another layer of paper and then make a slit in the middle where the wing will be attached to the fuselage.
![]() The illusion of windows and a windshield can be made by cutting holes just like this on a sheet of rolling paper to be wrapped around the fuselage.
The illusion of windows and a windshield can be made by cutting holes just like this on a sheet of rolling paper to be wrapped around the fuselage.
![]() Use the scissors to make a corresponding slit on the fuselage where the wings will connect. This hole will allow airflow so the plane can be successfully smoked like a cross joint.
Use the scissors to make a corresponding slit on the fuselage where the wings will connect. This hole will allow airflow so the plane can be successfully smoked like a cross joint.
![]() Attach the wings to the main body with another small piece of paper.
Attach the wings to the main body with another small piece of paper.
![]() To make turbines for the rear of the plane I simply rolled a joint and cut small sections out to attach to the filter. The tail wing can be made using cardboard and can be slid into a small slit cut into the filter. Both the tail wing and turbines are for aesthetic value and don not change the function of the joint, infancy the tail wing should be removed before smoking.
To make turbines for the rear of the plane I simply rolled a joint and cut small sections out to attach to the filter. The tail wing can be made using cardboard and can be slid into a small slit cut into the filter. Both the tail wing and turbines are for aesthetic value and don not change the function of the joint, infancy the tail wing should be removed before smoking.


How would you light this?